如何讀取driver中printk所輸出的Linux kernel message?
solution:
cat /proc/kmsg即可得知printk所輸出的相關資訊囉
2015年5月18日 星期一

想要chmod 777 /dev/gsensor預到提示remount failed: Operation not permitted該如何處理呢?
想要chmod 777 /dev/gsensor預到提示remount failed: Operation not permitted該如何處理呢?
解決方案如下:
1. 進入shell
adb shell
2. shell下輸入命令
shell@android:/ $ su
shell@android:/ # mount -o rw,remount -t yaffs2 /dev/gsensor /system
shell@android:/ # chmod 777 /dev/gsensor
shell@android:/ # mount -o rw,remount -t yaffs2 /dev/gsensor /system
shell@android:/ # chmod 777 /dev/gsensor
shell@android:/ $
exit
2014年12月15日 星期一
全球最大市場在中國,2016 年智慧型手機使用者將突破 20 億
全球最大市場在中國,2016 年智慧型手機使用者將突破 20 億 http://chinese.vr-zone.com/137557/emarketer-newest-figure-2-billion-consumers-worldwide-to-get-smartphone-12152014/
Gartner 第三季智慧型手機出貨數據公佈,Samsung 依舊是市場一哥
Gartner 第三季智慧型手機出貨數據公佈,Samsung 依舊是市場一哥 http://chinese.vr-zone.com/137580/samsung-remain-the-first-in-gartner-report-12152014/
2014年10月17日 星期五
How to fix “The system is running in low-graphics mode” error?
今天在用vmware虛擬機架ubuntu 12.0.4時發生了一件悲參的事,那就是我的ubuntu重新開機時告訴我"The system is running in low-graphics mode"
在網路上找了半天終於找到了一個解決的方案:http://askubuntu.com/questions/141606/how-to-fix-the-system-is-running-in-low-graphics-mode-error
最後試了許多方案,我的方案是用了以下的方法最後才的:
在網路上找了半天終於找到了一個解決的方案:http://askubuntu.com/questions/141606/how-to-fix-the-system-is-running-in-low-graphics-mode-error
最後試了許多方案,我的方案是用了以下的方法最後才的:
sudo apt-get purge nvidia-*sudo apt-get autoremovesudo apt-get linux-source linux-headers-genericsudo apt-get install nvidia-currentsudo nvidia-xconfigsudo shutdown -r now
若不行的話請參考:
https://answers.launchpad.net/ubuntu/+source/xserver-xorg-video-nv/+question/214231
~$ sudo apt-get purge
nvidia-*
~$ sudo rm /etc/X11/xorg.conf
~$ sudo apt-get
install ubuntu-desktop
~$ sudo apt-get
install --reinstall xserver-xorg-video-nouveau
~$ sudo
dpkg-reconfigure xserver-xorg
~$ sudo
add-apt-repository ppa:ubuntu-x-swat/x-updates
~$ sudo apt-get update ; sudo apt-get dist-upgrade
~$ sudo apt-get install linux-headers-generic
~$ sudo apt-get install nvidia-current
~$ sudo nvidia-xconfig
若出現解析度報錯如何處理
執行sudo rm ~/.config/monitor.xml然後重啟即可
若顯示器初始只支援640x480又怎麼辦呢?
1.方法一:在vmware 設定 display為1366x768 or 1024 x 768 ...
2. 方案二:VMware安裝ubuntu12.04解析度設置無此項可通過修改開機解析度增加
~$ sudo apt-get update ; sudo apt-get dist-upgrade
~$ sudo apt-get install linux-headers-generic
~$ sudo apt-get install nvidia-current
~$ sudo nvidia-xconfig
若出現解析度報錯如何處理
執行sudo rm ~/.config/monitor.xml然後重啟即可
若顯示器初始只支援640x480又怎麼辦呢?
1.方法一:在vmware 設定 display為1366x768 or 1024 x 768 ...
2. 方案二:VMware安裝ubuntu12.04解析度設置無此項可通過修改開機解析度增加
sudo
gedit /etc/default/grub
找到:#GRUB_GFXMODE=640x480 在這行下面加一行
GRUB_GFXMODE=1366x768
找到:#GRUB_GFXMODE=640x480 在這行下面加一行
GRUB_GFXMODE=1366x768
2014年9月9日 星期二
如何將ubuntu編譯後的執行檔案push到Android設備的/system/bin裡頭?(Permission denied)
最近在移植一款平板的G-sensor,想使用i2c tool,但該如何將ubuntu編譯後的執行檔案push到Android設備的/system/bin裡頭呢?
若直接將檔案push 到/system/bin將會遇到Read-only file system的錯誤訊息,解法如下述:
1. adb shell
2.mount -o rw,remount -t ext3 /system
3. adb push "file path & file name" to /system/bin
4. adb shell
5. cd /system/bin
6. chmod 777 i2cdetect, i2cdump, i2cget, i2cset四個檔案
接下來就可以使用i2c tool啦
若直接將檔案push 到/system/bin將會遇到Read-only file system的錯誤訊息,解法如下述:
1. adb shell
2.mount -o rw,remount -t ext3 /system
3. adb push "file path & file name" to /system/bin
4. adb shell
5. cd /system/bin
6. chmod 777 i2cdetect, i2cdump, i2cget, i2cset四個檔案
接下來就可以使用i2c tool啦
2014年9月5日 星期五
I2C Tool presentation
今天來介紹一下如何在ARM base的手機或平板來Debug I2C以及I2C tool
- Download source code
- 下載源碼:
- 解壓源碼包:
tar -xvf i2c-tools-3.1.0.tar.bz2
- 進入tools目錄
i2cdetect – 列舉I2C bus和上面所有的設備
i2cdump – 列印設備(如 codec,camera)上所有register的值
i2cget – 讀設備某個 register的值
i2cset – 設置某個register的值
- 編譯 I2C Tools:
PS:請自行建立Compiler環境,需使用ARM
Linux一般之compiler
- I2C Detect
arm-linux-gnueabi-gcc-4.6
-O2 -I../include -c i2cdetect.c -static -o i2cdetect.o
arm-linux-gnueabi-gcc-4.6
-O2 -I../include -c i2cbusses.c -static -o i2cbusses.o
arm-linux-gnueabi-gcc-4.6
-O2 -I../include i2cdetect.o i2cbusses.o -static -o i2cdetect
- I2C Dump
arm-linux-gnueabi-gcc-4.6
-O2 -I../include -c i2cdump.c -static -o i2cdump.o
arm-linux-gnueabi-gcc-4.6
-O2 -I../include -c i2cbusses.c -static -o i2cbusses.o
arm-linux-gnueabi-gcc-4.6
-O2 -I../include -c util.c -static -o util.o
arm-linux-gnueabi-gcc-4.6
-O2 -I../include i2cdump.o util.o i2cbusses.o -static -o i2cdump
- I2C Get
arm-linux-gnueabi-gcc-4.6
-O2 -I../include -c i2cget.c -static -o i2cget.o
arm-linux-gnueabi-gcc-4.6
-O2 -I../include -c i2cbusses.c -static -o i2cbusses.o
arm-linux-gnueabi-gcc-4.6
-O2 -I../include -c util.c -static -o util.o
arm-linux-gnueabi-gcc-4.6
-O2 -I../include i2cget.o util.o i2cbusses.o -static -o i2cget
- I2C Set
arm-linux-gnueabi-gcc-4.6
-O2 -I../include -c i2cset.c -static -o i2cset.o
arm-linux-gnueabi-gcc-4.6
-O2 -I../include -c i2cbusses.c -static -o i2cbusses.o
arm-linux-gnueabi-gcc-4.6
-O2 -I../include -c util.c -static -o util.o
arm-linux-gnueabi-gcc-4.6
-O2 -I../include i2cset.o util.o i2cbusses.o -static -o i2cset
- 串口線作業流程
- 插上串口線 & 將平板開機
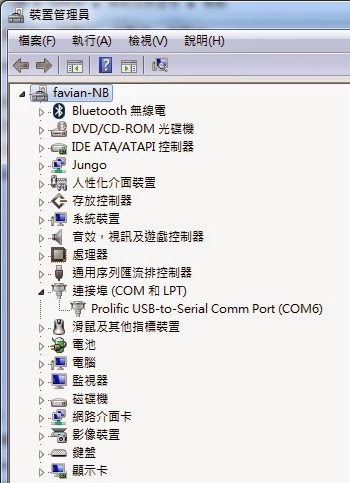
- 用Windows裝置管理員確認Comport(下圖為COM6)
- 打開Putty,利用putty登入
Putty
download位置:http://the.earth.li/~sgtatham/putty/latest/x86/putty.exe

- 用Putty將檔案放入機器
adb push
\\UBUNTU\user\course\i2c-tools-3.1.0\tools\i2cdetect
/system/bin
PS:其他三個檔案皆如此
- USB作業流程
- 插上USB線 & 將平板開機
- 用adb tool將檔案放入機器

- 改變檔案的Mode
chmod 777 i2cdump
(所有檔案皆需經此步驟
- 執行指令
- i2cdetect –l 確認此平板有那些I2C總線,下述範圍表示有3條I2C總線

- i2cdetect -y -r 0掃描第0條I2C總線

- i2cdump -f -y 0 0x4CDump第0條I2C總線Address 0x4C的所有Register值

i2cget -f -y 1 0x4c 0x08
=>取得i2c bus 1,I2C address為0x4C,register 0x08之data
i2cset-f -y 1 0x4c 0x08 0x00
=>設定i2c bus 1,I2C address為0x4C,register 0x08為0x00
Appendix:
I2C
address: 28 (0x1C) MMA8452
I2C
address: 76 (0x4C) MMA7660
I2C
address: 83 (0x53) ADXL345
I2C
address: 104 (0x68) MPU6050
訂閱:
文章 (Atom)