最近在移植一款平板的G-sensor,想使用i2c tool,但該如何將ubuntu編譯後的執行檔案push到Android設備的/system/bin裡頭呢?
若直接將檔案push 到/system/bin將會遇到Read-only file system的錯誤訊息,解法如下述:
1. adb shell
2.mount -o rw,remount -t ext3 /system
3. adb push "file path & file name" to /system/bin
4. adb shell
5. cd /system/bin
6. chmod 777 i2cdetect, i2cdump, i2cget, i2cset四個檔案
接下來就可以使用i2c tool啦

2014年9月5日 星期五
I2C Tool presentation
今天來介紹一下如何在ARM base的手機或平板來Debug I2C以及I2C tool
- Download source code
- 下載源碼:
- 解壓源碼包:
tar -xvf i2c-tools-3.1.0.tar.bz2
- 進入tools目錄
i2cdetect – 列舉I2C bus和上面所有的設備
i2cdump – 列印設備(如 codec,camera)上所有register的值
i2cget – 讀設備某個 register的值
i2cset – 設置某個register的值
- 編譯 I2C Tools:
PS:請自行建立Compiler環境,需使用ARM
Linux一般之compiler
- I2C Detect
arm-linux-gnueabi-gcc-4.6
-O2 -I../include -c i2cdetect.c -static -o i2cdetect.o
arm-linux-gnueabi-gcc-4.6
-O2 -I../include -c i2cbusses.c -static -o i2cbusses.o
arm-linux-gnueabi-gcc-4.6
-O2 -I../include i2cdetect.o i2cbusses.o -static -o i2cdetect
- I2C Dump
arm-linux-gnueabi-gcc-4.6
-O2 -I../include -c i2cdump.c -static -o i2cdump.o
arm-linux-gnueabi-gcc-4.6
-O2 -I../include -c i2cbusses.c -static -o i2cbusses.o
arm-linux-gnueabi-gcc-4.6
-O2 -I../include -c util.c -static -o util.o
arm-linux-gnueabi-gcc-4.6
-O2 -I../include i2cdump.o util.o i2cbusses.o -static -o i2cdump
- I2C Get
arm-linux-gnueabi-gcc-4.6
-O2 -I../include -c i2cget.c -static -o i2cget.o
arm-linux-gnueabi-gcc-4.6
-O2 -I../include -c i2cbusses.c -static -o i2cbusses.o
arm-linux-gnueabi-gcc-4.6
-O2 -I../include -c util.c -static -o util.o
arm-linux-gnueabi-gcc-4.6
-O2 -I../include i2cget.o util.o i2cbusses.o -static -o i2cget
- I2C Set
arm-linux-gnueabi-gcc-4.6
-O2 -I../include -c i2cset.c -static -o i2cset.o
arm-linux-gnueabi-gcc-4.6
-O2 -I../include -c i2cbusses.c -static -o i2cbusses.o
arm-linux-gnueabi-gcc-4.6
-O2 -I../include -c util.c -static -o util.o
arm-linux-gnueabi-gcc-4.6
-O2 -I../include i2cset.o util.o i2cbusses.o -static -o i2cset
- 串口線作業流程
- 插上串口線 & 將平板開機
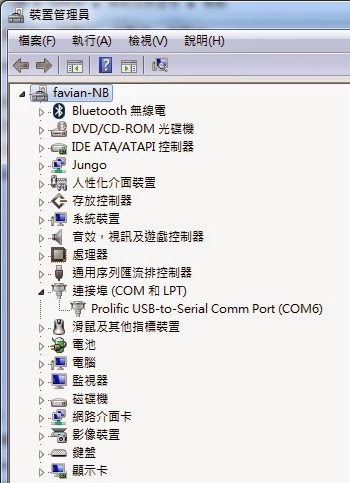
- 用Windows裝置管理員確認Comport(下圖為COM6)
- 打開Putty,利用putty登入
Putty
download位置:http://the.earth.li/~sgtatham/putty/latest/x86/putty.exe

- 用Putty將檔案放入機器
adb push
\\UBUNTU\user\course\i2c-tools-3.1.0\tools\i2cdetect
/system/bin
PS:其他三個檔案皆如此
- USB作業流程
- 插上USB線 & 將平板開機
- 用adb tool將檔案放入機器

- 改變檔案的Mode
chmod 777 i2cdump
(所有檔案皆需經此步驟
- 執行指令
- i2cdetect –l 確認此平板有那些I2C總線,下述範圍表示有3條I2C總線

- i2cdetect -y -r 0掃描第0條I2C總線

- i2cdump -f -y 0 0x4CDump第0條I2C總線Address 0x4C的所有Register值

i2cget -f -y 1 0x4c 0x08
=>取得i2c bus 1,I2C address為0x4C,register 0x08之data
i2cset-f -y 1 0x4c 0x08 0x00
=>設定i2c bus 1,I2C address為0x4C,register 0x08為0x00
Appendix:
I2C
address: 28 (0x1C) MMA8452
I2C
address: 76 (0x4C) MMA7660
I2C
address: 83 (0x53) ADXL345
I2C
address: 104 (0x68) MPU6050
ubuntu 12.04 LTS 無法更新,apt-get update issue
最近在架設Armcore EVB開發平台,發現ubuntu 12.04無法執行apt-get update;上網找了很多方案都失敗,最後發現一個網站的方案才讓我的ubuntu 12.04能夠update安裝包,特意介紹給大家;網址是http://note.drx.tw/2012/01/mirror.html。
另轉載方案如下述:
2.1. 在取代前得先找出目前使用的 mirror。
2.2. 將 tw.archive.ubuntu.com 替換成 free.nchc.org.tw。
另轉載方案如下述:
1. 使用更新管理員更換 mirror
 |
| 1.1. 開啟「更新管理員」。 |
 |
| 1.2. 點選「設定」按鈕。 |
 |
| 1.3. 點選「下載自:」 一欄,並點選「其他...」。 |
 |
| 1.4. 找到國網中心的 mirror 後點選「選擇伺服器」。 |
2. 使用 sed 取代 mirror
2.1. 在取代前得先找出目前使用的 mirror。
jonny@oneiric:~$ cat /etc/apt/sources.list | grep main | awk '{ print $2}' | cut -d'/' -f3 | sed -n '3P' [Enter]tw.archive.ubuntu.com
2.2. 將 tw.archive.ubuntu.com 替換成 free.nchc.org.tw。
jonny@oneiric:~$ sudo sed -i 's/tw.archive.ubuntu.com/free.nchc.org.tw/g' /etc/apt/sources.list [Enter]
2014年8月15日 星期五
重力小球上架啦
又一個小遊戲(誤),好像比較像一個小小工具=>重力小球上架啦,原本只想用來測試G-sensor的運作;乾脆分享給大家玩囉。
https://play.google.com/store/apps/details?id=com.capture4me.gravityball



一個利用手機中的重力加速度計來控制的重力小球,提供三軸資料及小球來測試您的重力加速度計哦
https://play.google.com/store/apps/details?id=com.capture4me.gravityball
一個利用手機中的重力加速度計來控制的重力小球,提供三軸資料及小球來測試您的重力加速度計哦
!!小知識補充!!
"G-sensor"是Gravity sensor之縮寫,一般也可稱為"Accelerometer"或稱為加速規,又稱加速計、加速針、加速度感測器、重力加速度感測器等等,是測量加速度的裝置;加速規的應用之一是測量重力,特別是使用於重量測定法的加速規上,這樣的裝置稱為重力計。
"G-sensor"是Gravity sensor之縮寫,一般也可稱為"Accelerometer"或稱為加速規,又稱加速計、加速針、加速度感測器、重力加速度感測器等等,是測量加速度的裝置;加速規的應用之一是測量重力,特別是使用於重量測定法的加速規上,這樣的裝置稱為重力計。
一个利用手机中的重力加速度计来控制的重力小球,提供三轴数据及小球来测试您的重力加速度计哦
!!小知识补充!!
"G-sensor"是Gravity sensor之缩写,一般也可称为"Accelerometer"或称为加速规,又称加速计、加速针、加速度传感器、重力加速度传感器等等,是测量加速度的装置;加速规的应用之一是测量重力,特别是使用于重量测定法的加速规上,这样的装置称为重力计。
This app can use g-sensor to control gravity ball, gravity ball provided g-sensor information and 3-axis g-sensor value.
!! knowledge supplement!!
"G-sensor" is an abbreviation Gravity sensor, which generally also be referred to "Accelerometer".
Feel free to email me with any questions.
E-mail:capture4me@gmail.com
2014年7月21日 星期一
new LoadingDataAsyncTask().execute();重複執行造成App閃退的問題
今天在執行專案時,發現螢幕休眠後再重啟專案居然給我閃退;查了判天原來是因為將
MsgBox.setText("Loading......");
psDialog = ProgressDialog.show(getActivity(), "訊息", "資料載入中,請稍候...");
new LoadingDataAsyncTask().execute();
放在onStart()裡頭,休眠後再重啟時造成的異常;把這個Function移到onCreateView()裡頭即可解決重啟閃退的問題囉.
以下為專案的生命週期Log:
07-21 16:06:55.354: I/Capture4me_log(31191): ~~~ Start MainActivity onRestart ~~~
07-21 16:06:55.354: I/Capture4me_log(31191): ~~~ Start MainActivity onStart ~~~
07-21 16:06:55.354: I/Capture4me_log(31191): ~~~ Start MainActivity Tracker onStart ~~~
07-21 16:06:55.354: I/Capture4me_log(31191): ~~~ Start Fragment onStart ~~~
07-21 16:06:55.476: I/Capture4me_log(31191): ~~~ Start MainActivity onResume ~~~
07-21 16:06:55.477: I/Capture4me_log(31191): ~~~ Start Fragment adView.resume~~~
屏幕休眠
07-21 16:06:56.330: I/Capture4me_log(31191): ~~~ Start Fragment onPause ~~~
07-21 16:06:56.330: I/Capture4me_log(31191): ~~~ Start Fragment adView.pause~~~
07-21 16:06:56.330: I/Capture4me_log(31191): ~~~ Start MainActivity onPause ~~~
07-21 16:06:57.511: I/Capture4me_log(31191): ~~~ Start Fragment onStop ~~~
07-21 16:06:57.511: I/Capture4me_log(31191): ~~~ Start MainActivity onStop ~~~
07-21 16:06:57.511: I/Capture4me_log(31191): ~~~ Start MainActivity Tracker onStop ~~~
重啟屏幕
07-21 16:27:43.118: I/Capture4me_log(32192): ~~~ Start MainActivity onRestart ~~~
07-21 16:27:43.118: I/Capture4me_log(32192): ~~~ Start MainActivity onStart ~~~
07-21 16:27:43.118: I/Capture4me_log(32192): ~~~ Start MainActivity Tracker onStart ~~~
07-21 16:27:43.118: I/Capture4me_log(32192): ~~~ Start Fragment onStart ~~~
07-21 16:27:43.122: I/Capture4me_log(32192): ~~~ Start MainActivity onResume ~~~
07-21 16:27:43.122: I/Capture4me_log(32192): ~~~ Start Fragment adView.resume~~~
MsgBox.setText("Loading......");
psDialog = ProgressDialog.show(getActivity(), "訊息", "資料載入中,請稍候...");
new LoadingDataAsyncTask().execute();
放在onStart()裡頭,休眠後再重啟時造成的異常;把這個Function移到onCreateView()裡頭即可解決重啟閃退的問題囉.
以下為專案的生命週期Log:
07-21 16:06:55.354: I/Capture4me_log(31191): ~~~ Start MainActivity onRestart ~~~
07-21 16:06:55.354: I/Capture4me_log(31191): ~~~ Start MainActivity onStart ~~~
07-21 16:06:55.354: I/Capture4me_log(31191): ~~~ Start MainActivity Tracker onStart ~~~
07-21 16:06:55.354: I/Capture4me_log(31191): ~~~ Start Fragment onStart ~~~
07-21 16:06:55.476: I/Capture4me_log(31191): ~~~ Start MainActivity onResume ~~~
07-21 16:06:55.477: I/Capture4me_log(31191): ~~~ Start Fragment adView.resume~~~
屏幕休眠
07-21 16:06:56.330: I/Capture4me_log(31191): ~~~ Start Fragment onPause ~~~
07-21 16:06:56.330: I/Capture4me_log(31191): ~~~ Start Fragment adView.pause~~~
07-21 16:06:56.330: I/Capture4me_log(31191): ~~~ Start MainActivity onPause ~~~
07-21 16:06:57.511: I/Capture4me_log(31191): ~~~ Start Fragment onStop ~~~
07-21 16:06:57.511: I/Capture4me_log(31191): ~~~ Start MainActivity onStop ~~~
07-21 16:06:57.511: I/Capture4me_log(31191): ~~~ Start MainActivity Tracker onStop ~~~
重啟屏幕
07-21 16:27:43.118: I/Capture4me_log(32192): ~~~ Start MainActivity onRestart ~~~
07-21 16:27:43.118: I/Capture4me_log(32192): ~~~ Start MainActivity onStart ~~~
07-21 16:27:43.118: I/Capture4me_log(32192): ~~~ Start MainActivity Tracker onStart ~~~
07-21 16:27:43.118: I/Capture4me_log(32192): ~~~ Start Fragment onStart ~~~
07-21 16:27:43.122: I/Capture4me_log(32192): ~~~ Start MainActivity onResume ~~~
07-21 16:27:43.122: I/Capture4me_log(32192): ~~~ Start Fragment adView.resume~~~
2014年7月17日 星期四
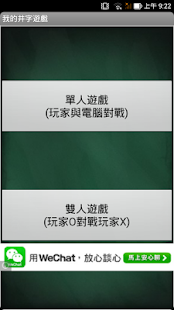
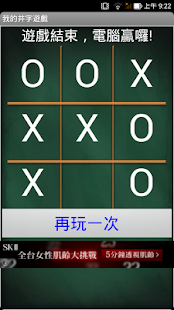
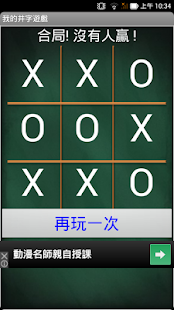
第乙支遊戲App:"我的井字遊戲"上架啦
辛苦了兩週終於將第乙支遊戲App"我的井字遊戲"推出上架啦,目前針對不同解析度還在思考如何可以讓使用者有較佳的遊戲感受.
Google play:
https://play.google.com/store/apps/details?id=com.capture4me.MyTicTacToe
Google play:
https://play.google.com/store/apps/details?id=com.capture4me.MyTicTacToe
說明
2014年7月2日 星期三
介紹一個照片轉各類型圖示檔線上程式
介紹一個照片轉各類型圖示檔線上程式
http://www.pic2icon.com/zh-tw/format_conversion.php
當你要上架時需要一個512 x 512 pixel的高解析度圖示要怎麼辦咧?
到上述的網站你就會發現可不只有提供512 x 512 pixel的圖檔轉換,還提供由16 x 16到1024 x 1024解析度的轉檔;不但方法超簡單而且很貼心呢!!
http://www.pic2icon.com/zh-tw/format_conversion.php
當你要上架時需要一個512 x 512 pixel的高解析度圖示要怎麼辦咧?
到上述的網站你就會發現可不只有提供512 x 512 pixel的圖檔轉換,還提供由16 x 16到1024 x 1024解析度的轉檔;不但方法超簡單而且很貼心呢!!
訂閱:
文章 (Atom)