全球最大市場在中國,2016 年智慧型手機使用者將突破 20 億 http://chinese.vr-zone.com/137557/emarketer-newest-figure-2-billion-consumers-worldwide-to-get-smartphone-12152014/
2014年12月15日 星期一
Gartner 第三季智慧型手機出貨數據公佈,Samsung 依舊是市場一哥
Gartner 第三季智慧型手機出貨數據公佈,Samsung 依舊是市場一哥 http://chinese.vr-zone.com/137580/samsung-remain-the-first-in-gartner-report-12152014/
2014年10月17日 星期五
How to fix “The system is running in low-graphics mode” error?
今天在用vmware虛擬機架ubuntu 12.0.4時發生了一件悲參的事,那就是我的ubuntu重新開機時告訴我"The system is running in low-graphics mode"
在網路上找了半天終於找到了一個解決的方案:http://askubuntu.com/questions/141606/how-to-fix-the-system-is-running-in-low-graphics-mode-error
最後試了許多方案,我的方案是用了以下的方法最後才的:
在網路上找了半天終於找到了一個解決的方案:http://askubuntu.com/questions/141606/how-to-fix-the-system-is-running-in-low-graphics-mode-error
最後試了許多方案,我的方案是用了以下的方法最後才的:
sudo apt-get purge nvidia-*sudo apt-get autoremovesudo apt-get linux-source linux-headers-genericsudo apt-get install nvidia-currentsudo nvidia-xconfigsudo shutdown -r now
若不行的話請參考:
https://answers.launchpad.net/ubuntu/+source/xserver-xorg-video-nv/+question/214231
~$ sudo apt-get purge
nvidia-*
~$ sudo rm /etc/X11/xorg.conf
~$ sudo apt-get
install ubuntu-desktop
~$ sudo apt-get
install --reinstall xserver-xorg-video-nouveau
~$ sudo
dpkg-reconfigure xserver-xorg
~$ sudo
add-apt-repository ppa:ubuntu-x-swat/x-updates
~$ sudo apt-get update ; sudo apt-get dist-upgrade
~$ sudo apt-get install linux-headers-generic
~$ sudo apt-get install nvidia-current
~$ sudo nvidia-xconfig
若出現解析度報錯如何處理
執行sudo rm ~/.config/monitor.xml然後重啟即可
若顯示器初始只支援640x480又怎麼辦呢?
1.方法一:在vmware 設定 display為1366x768 or 1024 x 768 ...
2. 方案二:VMware安裝ubuntu12.04解析度設置無此項可通過修改開機解析度增加
sudo
gedit /etc/default/grub
找到:#GRUB_GFXMODE=640x480 在這行下面加一行
GRUB_GFXMODE=1366x768
找到:#GRUB_GFXMODE=640x480 在這行下面加一行
GRUB_GFXMODE=1366x768
2014年9月9日 星期二
如何將ubuntu編譯後的執行檔案push到Android設備的/system/bin裡頭?(Permission denied)
最近在移植一款平板的G-sensor,想使用i2c tool,但該如何將ubuntu編譯後的執行檔案push到Android設備的/system/bin裡頭呢?
若直接將檔案push 到/system/bin將會遇到Read-only file system的錯誤訊息,解法如下述:
1. adb shell
2.mount -o rw,remount -t ext3 /system
3. adb push "file path & file name" to /system/bin
4. adb shell
5. cd /system/bin
6. chmod 777 i2cdetect, i2cdump, i2cget, i2cset四個檔案
接下來就可以使用i2c tool啦
若直接將檔案push 到/system/bin將會遇到Read-only file system的錯誤訊息,解法如下述:
1. adb shell
2.mount -o rw,remount -t ext3 /system
3. adb push "file path & file name" to /system/bin
4. adb shell
5. cd /system/bin
6. chmod 777 i2cdetect, i2cdump, i2cget, i2cset四個檔案
接下來就可以使用i2c tool啦
2014年9月5日 星期五
I2C Tool presentation
今天來介紹一下如何在ARM base的手機或平板來Debug I2C以及I2C tool
- Download source code
- 下載源碼:
- 解壓源碼包:
tar -xvf i2c-tools-3.1.0.tar.bz2
- 進入tools目錄
i2cdetect – 列舉I2C bus和上面所有的設備
i2cdump – 列印設備(如 codec,camera)上所有register的值
i2cget – 讀設備某個 register的值
i2cset – 設置某個register的值
- 編譯 I2C Tools:
PS:請自行建立Compiler環境,需使用ARM
Linux一般之compiler
- I2C Detect
arm-linux-gnueabi-gcc-4.6
-O2 -I../include -c i2cdetect.c -static -o i2cdetect.o
arm-linux-gnueabi-gcc-4.6
-O2 -I../include -c i2cbusses.c -static -o i2cbusses.o
arm-linux-gnueabi-gcc-4.6
-O2 -I../include i2cdetect.o i2cbusses.o -static -o i2cdetect
- I2C Dump
arm-linux-gnueabi-gcc-4.6
-O2 -I../include -c i2cdump.c -static -o i2cdump.o
arm-linux-gnueabi-gcc-4.6
-O2 -I../include -c i2cbusses.c -static -o i2cbusses.o
arm-linux-gnueabi-gcc-4.6
-O2 -I../include -c util.c -static -o util.o
arm-linux-gnueabi-gcc-4.6
-O2 -I../include i2cdump.o util.o i2cbusses.o -static -o i2cdump
- I2C Get
arm-linux-gnueabi-gcc-4.6
-O2 -I../include -c i2cget.c -static -o i2cget.o
arm-linux-gnueabi-gcc-4.6
-O2 -I../include -c i2cbusses.c -static -o i2cbusses.o
arm-linux-gnueabi-gcc-4.6
-O2 -I../include -c util.c -static -o util.o
arm-linux-gnueabi-gcc-4.6
-O2 -I../include i2cget.o util.o i2cbusses.o -static -o i2cget
- I2C Set
arm-linux-gnueabi-gcc-4.6
-O2 -I../include -c i2cset.c -static -o i2cset.o
arm-linux-gnueabi-gcc-4.6
-O2 -I../include -c i2cbusses.c -static -o i2cbusses.o
arm-linux-gnueabi-gcc-4.6
-O2 -I../include -c util.c -static -o util.o
arm-linux-gnueabi-gcc-4.6
-O2 -I../include i2cset.o util.o i2cbusses.o -static -o i2cset
- 串口線作業流程
- 插上串口線 & 將平板開機
- 用Windows裝置管理員確認Comport(下圖為COM6)
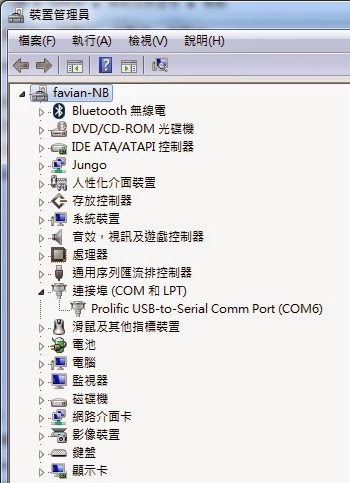
- 打開Putty,利用putty登入
Putty
download位置:http://the.earth.li/~sgtatham/putty/latest/x86/putty.exe

- 用Putty將檔案放入機器
adb push
\\UBUNTU\user\course\i2c-tools-3.1.0\tools\i2cdetect
/system/bin
PS:其他三個檔案皆如此
- USB作業流程
- 插上USB線 & 將平板開機
- 用adb tool將檔案放入機器

- 改變檔案的Mode
chmod 777 i2cdump
(所有檔案皆需經此步驟
- 執行指令
- i2cdetect –l 確認此平板有那些I2C總線,下述範圍表示有3條I2C總線

- i2cdetect -y -r 0掃描第0條I2C總線

- i2cdump -f -y 0 0x4CDump第0條I2C總線Address 0x4C的所有Register值

i2cget -f -y 1 0x4c 0x08
=>取得i2c bus 1,I2C address為0x4C,register 0x08之data
i2cset-f -y 1 0x4c 0x08 0x00
=>設定i2c bus 1,I2C address為0x4C,register 0x08為0x00
Appendix:
I2C
address: 28 (0x1C) MMA8452
I2C
address: 76 (0x4C) MMA7660
I2C
address: 83 (0x53) ADXL345
I2C
address: 104 (0x68) MPU6050
ubuntu 12.04 LTS 無法更新,apt-get update issue
最近在架設Armcore EVB開發平台,發現ubuntu 12.04無法執行apt-get update;上網找了很多方案都失敗,最後發現一個網站的方案才讓我的ubuntu 12.04能夠update安裝包,特意介紹給大家;網址是http://note.drx.tw/2012/01/mirror.html。
另轉載方案如下述:
2.1. 在取代前得先找出目前使用的 mirror。
2.2. 將 tw.archive.ubuntu.com 替換成 free.nchc.org.tw。
另轉載方案如下述:
1. 使用更新管理員更換 mirror
 |
| 1.1. 開啟「更新管理員」。 |
 |
| 1.2. 點選「設定」按鈕。 |
 |
| 1.3. 點選「下載自:」 一欄,並點選「其他...」。 |
 |
| 1.4. 找到國網中心的 mirror 後點選「選擇伺服器」。 |
2. 使用 sed 取代 mirror
2.1. 在取代前得先找出目前使用的 mirror。
jonny@oneiric:~$ cat /etc/apt/sources.list | grep main | awk '{ print $2}' | cut -d'/' -f3 | sed -n '3P' [Enter]tw.archive.ubuntu.com
2.2. 將 tw.archive.ubuntu.com 替換成 free.nchc.org.tw。
jonny@oneiric:~$ sudo sed -i 's/tw.archive.ubuntu.com/free.nchc.org.tw/g' /etc/apt/sources.list [Enter]
2014年8月15日 星期五
重力小球上架啦
又一個小遊戲(誤),好像比較像一個小小工具=>重力小球上架啦,原本只想用來測試G-sensor的運作;乾脆分享給大家玩囉。
https://play.google.com/store/apps/details?id=com.capture4me.gravityball
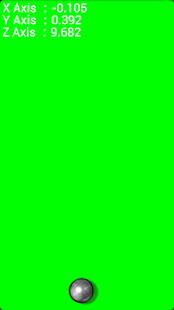

一個利用手機中的重力加速度計來控制的重力小球,提供三軸資料及小球來測試您的重力加速度計哦
https://play.google.com/store/apps/details?id=com.capture4me.gravityball
一個利用手機中的重力加速度計來控制的重力小球,提供三軸資料及小球來測試您的重力加速度計哦
!!小知識補充!!
"G-sensor"是Gravity sensor之縮寫,一般也可稱為"Accelerometer"或稱為加速規,又稱加速計、加速針、加速度感測器、重力加速度感測器等等,是測量加速度的裝置;加速規的應用之一是測量重力,特別是使用於重量測定法的加速規上,這樣的裝置稱為重力計。
"G-sensor"是Gravity sensor之縮寫,一般也可稱為"Accelerometer"或稱為加速規,又稱加速計、加速針、加速度感測器、重力加速度感測器等等,是測量加速度的裝置;加速規的應用之一是測量重力,特別是使用於重量測定法的加速規上,這樣的裝置稱為重力計。
一个利用手机中的重力加速度计来控制的重力小球,提供三轴数据及小球来测试您的重力加速度计哦
!!小知识补充!!
"G-sensor"是Gravity sensor之缩写,一般也可称为"Accelerometer"或称为加速规,又称加速计、加速针、加速度传感器、重力加速度传感器等等,是测量加速度的装置;加速规的应用之一是测量重力,特别是使用于重量测定法的加速规上,这样的装置称为重力计。
This app can use g-sensor to control gravity ball, gravity ball provided g-sensor information and 3-axis g-sensor value.
!! knowledge supplement!!
"G-sensor" is an abbreviation Gravity sensor, which generally also be referred to "Accelerometer".
Feel free to email me with any questions.
E-mail:capture4me@gmail.com
2014年7月21日 星期一
new LoadingDataAsyncTask().execute();重複執行造成App閃退的問題
今天在執行專案時,發現螢幕休眠後再重啟專案居然給我閃退;查了判天原來是因為將
MsgBox.setText("Loading......");
psDialog = ProgressDialog.show(getActivity(), "訊息", "資料載入中,請稍候...");
new LoadingDataAsyncTask().execute();
放在onStart()裡頭,休眠後再重啟時造成的異常;把這個Function移到onCreateView()裡頭即可解決重啟閃退的問題囉.
以下為專案的生命週期Log:
07-21 16:06:55.354: I/Capture4me_log(31191): ~~~ Start MainActivity onRestart ~~~
07-21 16:06:55.354: I/Capture4me_log(31191): ~~~ Start MainActivity onStart ~~~
07-21 16:06:55.354: I/Capture4me_log(31191): ~~~ Start MainActivity Tracker onStart ~~~
07-21 16:06:55.354: I/Capture4me_log(31191): ~~~ Start Fragment onStart ~~~
07-21 16:06:55.476: I/Capture4me_log(31191): ~~~ Start MainActivity onResume ~~~
07-21 16:06:55.477: I/Capture4me_log(31191): ~~~ Start Fragment adView.resume~~~
屏幕休眠
07-21 16:06:56.330: I/Capture4me_log(31191): ~~~ Start Fragment onPause ~~~
07-21 16:06:56.330: I/Capture4me_log(31191): ~~~ Start Fragment adView.pause~~~
07-21 16:06:56.330: I/Capture4me_log(31191): ~~~ Start MainActivity onPause ~~~
07-21 16:06:57.511: I/Capture4me_log(31191): ~~~ Start Fragment onStop ~~~
07-21 16:06:57.511: I/Capture4me_log(31191): ~~~ Start MainActivity onStop ~~~
07-21 16:06:57.511: I/Capture4me_log(31191): ~~~ Start MainActivity Tracker onStop ~~~
重啟屏幕
07-21 16:27:43.118: I/Capture4me_log(32192): ~~~ Start MainActivity onRestart ~~~
07-21 16:27:43.118: I/Capture4me_log(32192): ~~~ Start MainActivity onStart ~~~
07-21 16:27:43.118: I/Capture4me_log(32192): ~~~ Start MainActivity Tracker onStart ~~~
07-21 16:27:43.118: I/Capture4me_log(32192): ~~~ Start Fragment onStart ~~~
07-21 16:27:43.122: I/Capture4me_log(32192): ~~~ Start MainActivity onResume ~~~
07-21 16:27:43.122: I/Capture4me_log(32192): ~~~ Start Fragment adView.resume~~~
2014年7月17日 星期四
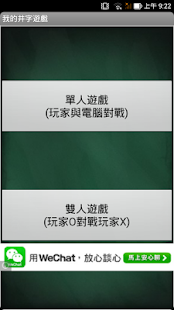
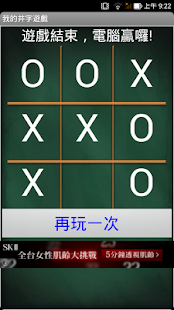
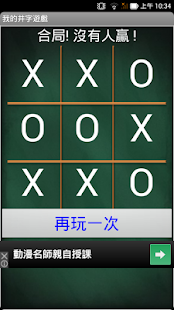
第乙支遊戲App:"我的井字遊戲"上架啦
辛苦了兩週終於將第乙支遊戲App"我的井字遊戲"推出上架啦,目前針對不同解析度還在思考如何可以讓使用者有較佳的遊戲感受.
Google play:
https://play.google.com/store/apps/details?id=com.capture4me.MyTicTacToe
Google play:
https://play.google.com/store/apps/details?id=com.capture4me.MyTicTacToe
說明
2014年7月2日 星期三
介紹一個照片轉各類型圖示檔線上程式
介紹一個照片轉各類型圖示檔線上程式
http://www.pic2icon.com/zh-tw/format_conversion.php
當你要上架時需要一個512 x 512 pixel的高解析度圖示要怎麼辦咧?
到上述的網站你就會發現可不只有提供512 x 512 pixel的圖檔轉換,還提供由16 x 16到1024 x 1024解析度的轉檔;不但方法超簡單而且很貼心呢!!
http://www.pic2icon.com/zh-tw/format_conversion.php
當你要上架時需要一個512 x 512 pixel的高解析度圖示要怎麼辦咧?
到上述的網站你就會發現可不只有提供512 x 512 pixel的圖檔轉換,還提供由16 x 16到1024 x 1024解析度的轉檔;不但方法超簡單而且很貼心呢!!
第三個App:我的手電筒上架啦
搞了三天終於將第三個手電筒Android App上架啦.

我的手電筒擁有三種模式:
1. 恆開/關模式:恆開/關模式一般用於手電筒之亮暗功能
2. 閃爍模式:用於SOS或掛在腳踏車亦可使用哦
3. 摩斯電碼模式:按亮放暗,隨使用者操控
!!它擁有簡單有樂趣的操作方法,不但快速啟動,而且完全免費!!
我的手电筒拥有三种模式:
1. 恒开/关模式:恒开/关模式一般用于手电筒之亮暗功能
2. 闪烁模式:用于SOS或挂在脚踏车亦可使用哦
3. 摩斯电码模式:按亮放暗,随使用者操控
!!它拥有简单有乐趣的操作方法,不但快速启动,而且完全免费!!
My flashlight has three modes,
First mode is turn ON / OFF mode:turn ON / OFF mode is generally used for always turn on or always turn off the flash light.
Second mode is flashing modes:for SOS use or when you ride bicycles you can put your mobile phone use as a headlight.
Third mode is Morse Code mode:Press the button then the light will turn on, when you release the button then it will be turn off, this mode can use as a Morse code.
! ! It has a simple and fun method of operation, it can be quick start, and it's free! !
Any questions, please email me if you have.
E-mail: capture4me@gmail.com
如何讓Imagebutton有被按下去的感覺
今天在作第三支App時苦思如何讓使用者再按下Imagebutton時在畫面中有被按下去的感覺呢?
首先要為各位介紹一個icon generator的網站:
http://romannurik.github.io/AndroidAssetStudio/icons-launcher.html#foreground.space.trim=1&foreground.space.pad=0&foreColor=33b5e5%2C0&crop=0&backgroundShape=bevel&backColor=ffffff%2C100
製作icon方法如下:
1. 製作Turn On icon
1-1 將圖檔存成png檔,打開launch icon generator web site後使用Image

1-2 選擇欲使用的icon再按對話框的開啟即可
 1-3 接下來將會看到各種不同解析度的icon,此時只要注意padding為0%
(純屬個人喜好,客倌可以向行依需求調整)


1-6 將此已改好檔名的png圖檔托到Android project裡頭的drawable就完成第一階段的任務

2. 製作Turn Off icon,這個仿照第一階段的任務,但在1-3選擇所需圖檔後需將padding由0%改為5%其餘步驟一樣

3. 將二個圖檔都托到project裡頭的drawable後即完成第二階段的任務,
在這裡我的檔名是poweron.png & poweroff.png
4. 程式如何切換:
4-1 切換imagebutton圖檔的方法需要使用
((ImageView) ButtonOnOff).setImageResource(R.drawable.poweron);//button initial
((ImageView) ButtonOnOff).setImageResource(R.drawable.poweroff);//button 按下時
這兩個指令即可,ButtonOnOff即imagebutton的id,而此imagebutton使用
setImageResource來呼叫切換R.drawable.poweron或R.drawable.poweron的圖檔
4-2.未按下的default畫面
 4-3.按下後所秀出的畫面

這樣是不是就有被按鍵被按下的感覺啦
首先要為各位介紹一個icon generator的網站:
http://romannurik.github.io/AndroidAssetStudio/icons-launcher.html#foreground.space.trim=1&foreground.space.pad=0&foreColor=33b5e5%2C0&crop=0&backgroundShape=bevel&backColor=ffffff%2C100
製作icon方法如下:
1. 製作Turn On icon
1-1 將圖檔存成png檔,打開launch icon generator web site後使用Image
1-2 選擇欲使用的icon再按對話框的開啟即可
(純屬個人喜好,客倌可以向行依需求調整)
1-4 下一步驟只要按"DOWNLOAD ZIP"即會將所有解析度的icon下載為zip檔
1-5 打開zip檔首先會看到res資料夾,進入res資料夾會看到各種不同Android解析度icon的資料夾,個人偏好drawable-xxhdpi(192 x 192 pixel)的圖檔;所以只要進入這個資料夾將檔案由ic_launcher.png改成所需的檔名即可。
2. 製作Turn Off icon,這個仿照第一階段的任務,但在1-3選擇所需圖檔後需將padding由0%改為5%其餘步驟一樣
3. 將二個圖檔都托到project裡頭的drawable後即完成第二階段的任務,
在這裡我的檔名是poweron.png & poweroff.png
4. 程式如何切換:
4-1 切換imagebutton圖檔的方法需要使用
((ImageView) ButtonOnOff).setImageResource(R.drawable.poweron);//button initial
((ImageView) ButtonOnOff).setImageResource(R.drawable.poweroff);//button 按下時
這兩個指令即可,ButtonOnOff即imagebutton的id,而此imagebutton使用
setImageResource來呼叫切換R.drawable.poweron或R.drawable.poweron的圖檔
4-2.未按下的default畫面
這樣是不是就有被按鍵被按下的感覺啦
2014年6月30日 星期一
第二個App上架啦,MTK G-sensor Calibration
第二個App上架啦,名字是MTK G-sensor Calibration
https://play.google.com/store/apps/details?id=com.capture4me.mtkg_sensorcalibration
本App主要針對內建聯發科(MTK)中央處理器(CPU)平台手機/平板之G-sensor校正後將校正值寫入系統之中,讓您的手機/平板即使重新開機後資料並不會遺失,故不用每次重新開機就要針對G-sensor來重新校正;一般手機/平板在玩摩托車或彈珠類型或其他等等的遊戲或工具類App像水平儀工具等都會大量使用到這個G-sensor感測器;透過G-sensor校正工具校正後可讓您的遊戲或工具類App表現更佳。
!!小知識補充!!
"G-sensor"是Gravity sensor之縮寫,一般也可稱為"Accelerometer"或稱為加速規,又稱加速計、加速針、加速度感測器、重力加速度感測器等等,是測量加速度的裝置;加速規的應用之一是測量重力,特別是使用於重量測定法的加速規上,這樣的裝置稱為重力計。
!!貼心的小提醒!!
1. 此App只針對聯發科(MTK)平台之G-sensor校準,並不適用於其他平台。
2. 校正時請將裝置平放


本App主要针对内建联发科(MTK)中央处理器(CPU)平台手机/平板之G-sensor校正后将校正值写入系统之中,让您的手机/平板即使重新启动后数据并不会遗失,故不用每次重新启动就要针对G-sensor来重新校正;一般手机/平板在玩摩托车或弹珠类型或其他等等的游戏或工具类App像水平仪工具等都会大量使用到这个G-sensor传感器;透过G-sensor校正工具校正后可让您的游戏或工具类App表现更佳。
!!小知识补充!!
"G-sensor"是Gravity sensor之缩写,一般也可称为"Accelerometer"或称为加速规,又称加速计、加速针、加速度传感器、重力加速度传感器等等,是测量加速度的装置;加速规的应用之一是测量重力,特别是使用于重量测定法的加速规上,这样的装置称为重力计。
!!贴心的小提醒!!
1. 此App只针对联发科(MTK)平台之G-sensor校准,并不适用于其他平台。
2. 校正时请将装置平放
This App main uses for Media-Tek CPU inside platform for mobile/tablet G-sensor calibration.
When the App calibrate then it will be written calibrate data to system, so that your phone or tablet even after reboot, this calibrate data is not lost, it is not necessary for every restart G-sensor to re-calibrate.
This App will better your g-sensor performance when you want to play like kind of motorcycle or playing marbles or other types of games or like level tools.
!! knowledge supplement!!
"G-sensor" is an abbreviation Gravity sensor, which generally also be referred to "Accelerometer".
!! Just remind !!
1. This App only calibration Media-Tek CPU platform's G-sensor, Can't not Calibration other platforms.
2. When you want to calibration the g-sensor, please flat your device first.
Feel free to email me with any questions.
E-mail:capture4me@gmail.com
https://play.google.com/store/apps/details?id=com.capture4me.mtkg_sensorcalibration
本App主要針對內建聯發科(MTK)中央處理器(CPU)平台手機/平板之G-sensor校正後將校正值寫入系統之中,讓您的手機/平板即使重新開機後資料並不會遺失,故不用每次重新開機就要針對G-sensor來重新校正;一般手機/平板在玩摩托車或彈珠類型或其他等等的遊戲或工具類App像水平儀工具等都會大量使用到這個G-sensor感測器;透過G-sensor校正工具校正後可讓您的遊戲或工具類App表現更佳。
!!小知識補充!!
"G-sensor"是Gravity sensor之縮寫,一般也可稱為"Accelerometer"或稱為加速規,又稱加速計、加速針、加速度感測器、重力加速度感測器等等,是測量加速度的裝置;加速規的應用之一是測量重力,特別是使用於重量測定法的加速規上,這樣的裝置稱為重力計。
!!貼心的小提醒!!
1. 此App只針對聯發科(MTK)平台之G-sensor校準,並不適用於其他平台。
2. 校正時請將裝置平放
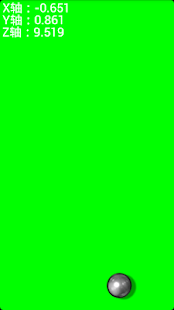
使用Calibration工具前,
X軸為0.0670(單位:m/s^2)
Y軸為0.2580(單位:m/s^2)=>若用這個狀態
Z軸為9.5380(單位:m/s^2),Z軸因此時手機平放所以會感受到1G(理論值為9.81m/s^2)
使用妨間免費的水平儀測試一下:
各位客倌可以發現水平儀的泡泡並不在中心的位置。
使用Calibration工具後,
X軸為0.0190(單位:m/s^2)
Y軸為0.0190(單位:m/s^2)
Z軸為9.8160(單位:m/s^2),Z軸因此時手機平放所以會感受到1G(理論值為9.81m/s^2)
使用妨間免費的水平儀再測試一下:
各位客倌可以發現水平儀的泡泡已經在中心點的位置。
是不是優化的非常好啦;
且這個App的優勢是重新開機也不需重新校準,是不是很方便啊。
!!小知识补充!!
"G-sensor"是Gravity sensor之缩写,一般也可称为"Accelerometer"或称为加速规,又称加速计、加速针、加速度传感器、重力加速度传感器等等,是测量加速度的装置;加速规的应用之一是测量重力,特别是使用于重量测定法的加速规上,这样的装置称为重力计。
!!贴心的小提醒!!
1. 此App只针对联发科(MTK)平台之G-sensor校准,并不适用于其他平台。
2. 校正时请将装置平放
This App main uses for Media-Tek CPU inside platform for mobile/tablet G-sensor calibration.
When the App calibrate then it will be written calibrate data to system, so that your phone or tablet even after reboot, this calibrate data is not lost, it is not necessary for every restart G-sensor to re-calibrate.
This App will better your g-sensor performance when you want to play like kind of motorcycle or playing marbles or other types of games or like level tools.
!! knowledge supplement!!
"G-sensor" is an abbreviation Gravity sensor, which generally also be referred to "Accelerometer".
!! Just remind !!
1. This App only calibration Media-Tek CPU platform's G-sensor, Can't not Calibration other platforms.
2. When you want to calibration the g-sensor, please flat your device first.
Feel free to email me with any questions.
E-mail:capture4me@gmail.com
2014年6月22日 星期日
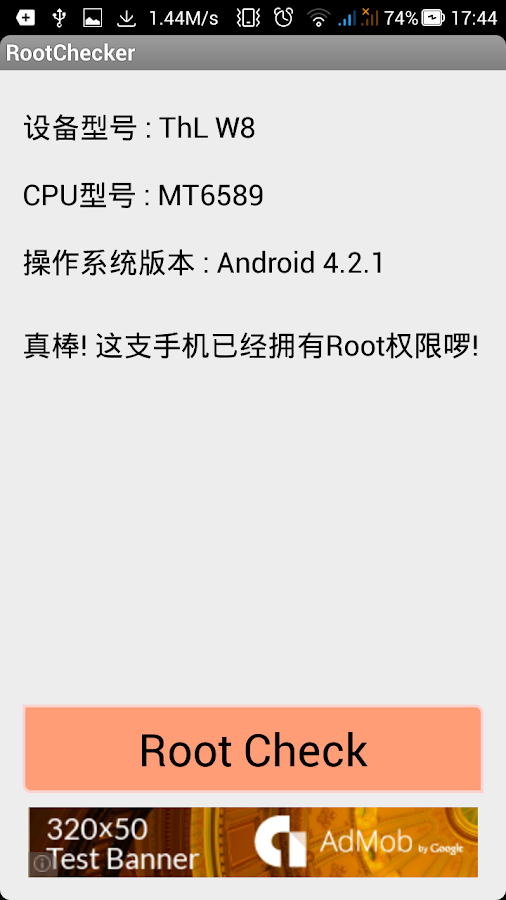
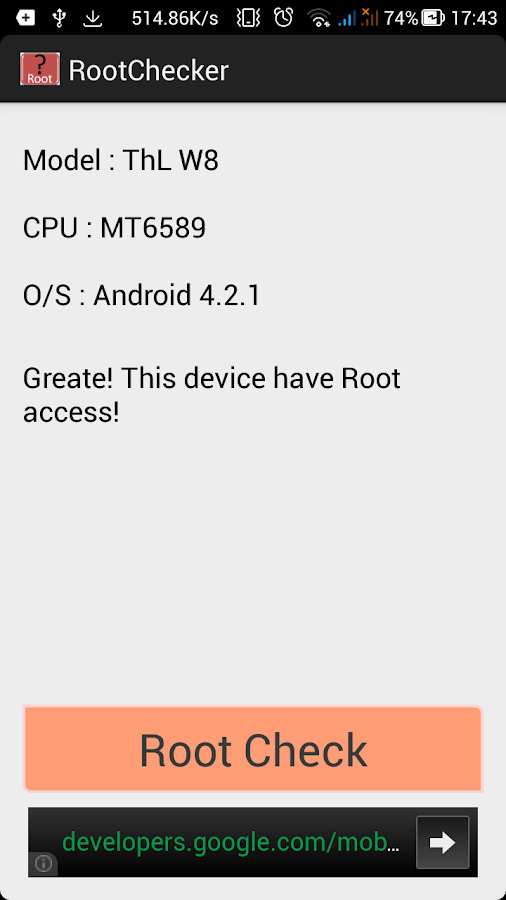
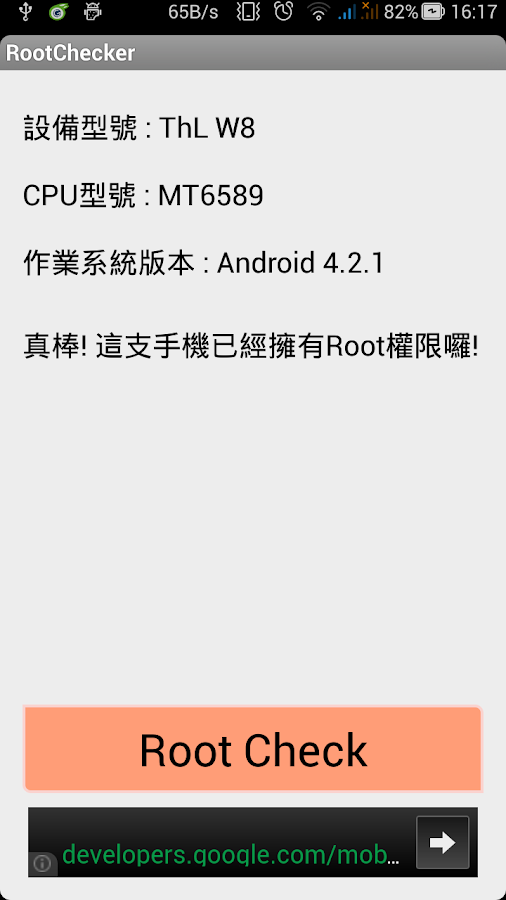
第一支Android 小工具App Root Checker上架啦
終於將第一個Android App上架囉,這個小工具會協助確認手機是否有Root權限;
!!這個應用軟體並不會root您的裝置,請安裝使用!!
且這個小工具會依你目前使用的是繁體、簡體或是英文來作自動切換;
請大家不吝指教
https://play.google.com/store/apps/details?id=com.capture4me.rootchecker

!!這個應用軟體並不會root您的裝置,請安裝使用!!
且這個小工具會依你目前使用的是繁體、簡體或是英文來作自動切換;
請大家不吝指教
https://play.google.com/store/apps/details?id=com.capture4me.rootchecker
Root Checker將會提供您的裝置上之一些資訊,如:您的設備資訊,CPU型號以及作業系統版本。
當您按下”Root Check”按鍵可以確認您的裝置是否擁有Root權限
!!這個應用軟體並不會root您的裝置,請安裝使用!!
若您有任何問題請給我發電子郵件。
Root Checker将会提供您的装置上之一些信息,如:您的设备信息,CPU型号以及操作系统版本。
当您按下”Root
Check”按键可以确认您的装置是否拥有Root权限
!!这个应用软件并不会root您的装置,请安装使用!!
若您有任何问题请给我发电子邮件。
Root Checker will give you some information:Your Device model name, CPU name and the
operation system version.
When you push the ”Root Check” button then
this application will check your device have root or not.
!!This application doesn’t root your
device, please feel at ease using it!!
Feel free to email me with any questions.
2014年6月19日 星期四
Unable to resolve target 'android-9'
Console告知Unable to resolve target 'android-9'怎麼辦呢?

解決方案:問題就出在我的workspace share共用後windows會在目錄下貼心的產生Desktop.ini,只要把目錄下的Desktop.ini逐一刪除即可;
真讓人當了一早上的清道夫真是累人啊
清除前:

清除後:
解決方案:問題就出在我的workspace share共用後windows會在目錄下貼心的產生Desktop.ini,只要把目錄下的Desktop.ini逐一刪除即可;
真讓人當了一早上的清道夫真是累人啊
清除前:
清除後:
2014年6月18日 星期三
Run configurations were not found project name
今天早上寫專案時突然發現Android Eclipse想要執行Run configurations時突然找不到Project name,天啊;該如何是好

解決方案:
1. 要設定的Project name下按滑鼠右鍵選擇Properties

2. 在Properties for "You Project name"選擇Java Build Path,切換為Order and Export頁面;將.jar library核對方框取消即可


解決方案:
1. 要設定的Project name下按滑鼠右鍵選擇Properties
2. 在Properties for "You Project name"選擇Java Build Path,切換為Order and Export頁面;將.jar library核對方框取消即可
另外一個可能的原因是在Properties for "You Project name"選擇Android下 Library的Is Library核對方框被打勾了,取消即可
所以結論是:不要隨便亂改設定啊
訂閱:
文章 (Atom)